- EaseUS Freeware
- Free Data Recovery Software
- Free Backup Software
- Free Partition Manager
Updated on 2025-03-31
This article appies to:
EaseUS Todo Backup Home
EaseUS Todo Backup Enterprise
What's This Error About?
When using EaseUS Todo Backup to perform a System Clone to a new drive, you might have an error similar to “There is insufficient space on target disk.” When this occurs, you will need to check if your case meets any one of the 2 scenarios below:
How to Fix It?
To ensure the system clone works properly, you are highly recommended to delete all the existing partitions on your target drive before you perform the clone.
This article provides you 2 methods to delete the partitions in Windows Command Prompt or in Disk Management.
NOTE: Before you follow this guide, please ensure you move out all the useful data from the target drive to another one. Deleting partitions will also eliminate all the files inside.
Delete Partitions in Windows Command Prompt (Recommended)
Using Diskpart command in Windows Command Prompt is an easy and safe way to delete partitions on a hard drive. In case you do not know how to access Windows Command Prompt, please click HERE. Please ensure you run the command prompt as administrator.
After you get the Windows Command Prompt window, please type in diskpart to enable the utility to delete the partitions on the drive.
The screenshot below shows you all the commands you need to type in in order to delete all the partitions on the target drive. We will explain all the steps in detail below.
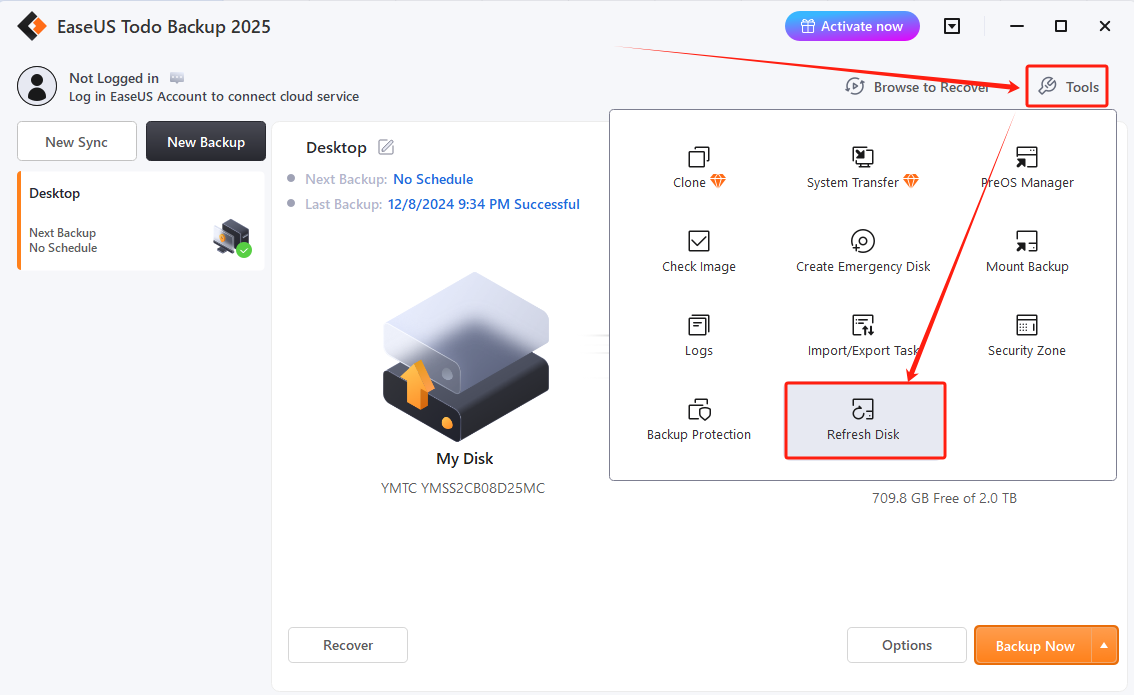
For your reference, Todo Backup Home users can find Refresh Disk in the screenshot below:
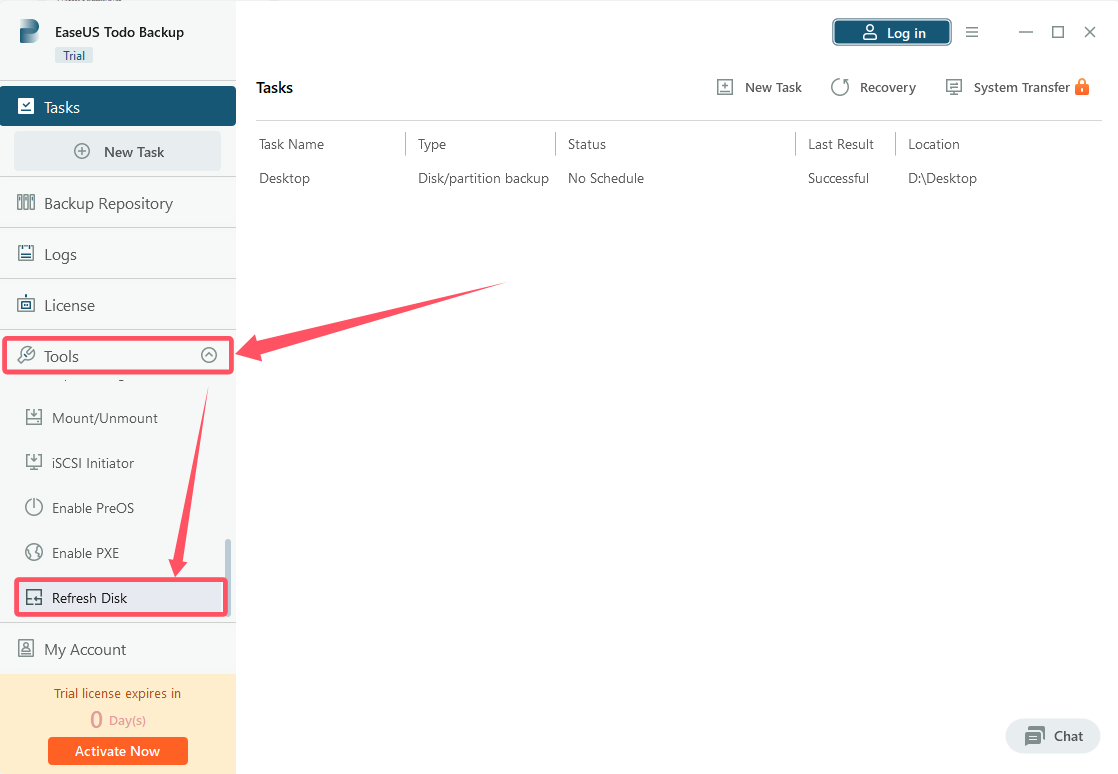
For Enterprise users, please refer to the screenshot below:
Delete Partitions in Disk Management
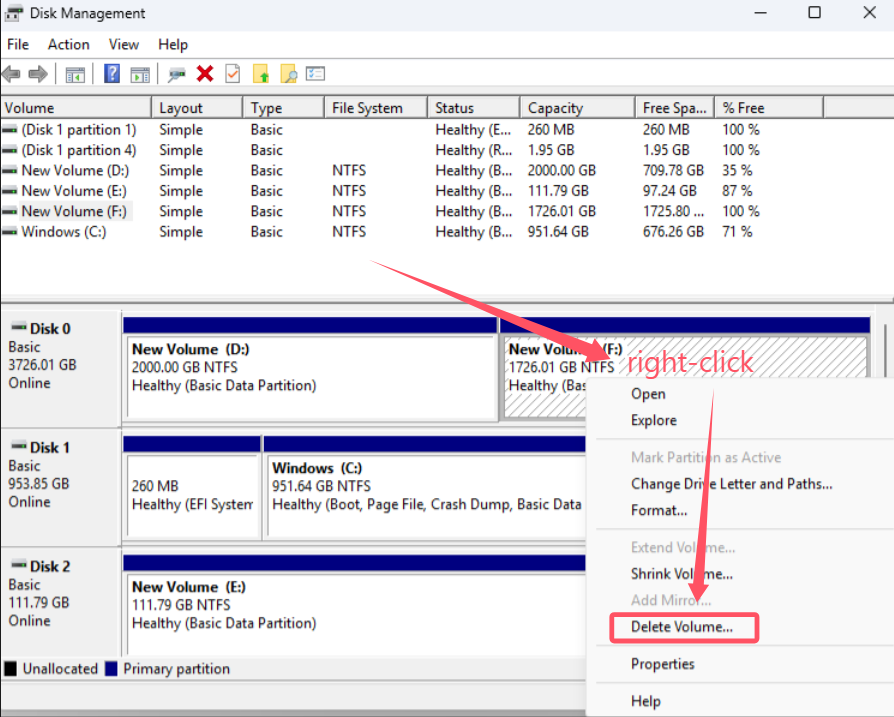
Windows Disk Management provides you the feature to delete a partition from a hard drive. To do that, you can right-click on the partition on the target disk, and select Delete Volume.
You might need to perform this operation on each partition separately until all the partitions are deleted from the target drive.
Note: Some partitions cannot be deleted in Disk Management. If this is your case, please follow the steps in Delete Partitions in Windows Command Prompt to delete them.
If you have any further questions or concerns following this guide, please feel free to contact us at techsupport@easeus.com.
EaseUS Todo Backup Home
EaseUS Todo Backup Enterprise
What's This Error About?
When using EaseUS Todo Backup to perform a System Clone to a new drive, you might have an error similar to “There is insufficient space on target disk.” When this occurs, you will need to check if your case meets any one of the 2 scenarios below:
- Scenario 1: The target drive does not have enough unallocated space to fit all the content from your source drive.
- Scenario 2: There are partitions created from the very left side of the target drive.
How to Fix It?
To ensure the system clone works properly, you are highly recommended to delete all the existing partitions on your target drive before you perform the clone.
This article provides you 2 methods to delete the partitions in Windows Command Prompt or in Disk Management.
NOTE: Before you follow this guide, please ensure you move out all the useful data from the target drive to another one. Deleting partitions will also eliminate all the files inside.
Delete Partitions in Windows Command Prompt (Recommended)
Using Diskpart command in Windows Command Prompt is an easy and safe way to delete partitions on a hard drive. In case you do not know how to access Windows Command Prompt, please click HERE. Please ensure you run the command prompt as administrator.
After you get the Windows Command Prompt window, please type in diskpart to enable the utility to delete the partitions on the drive.
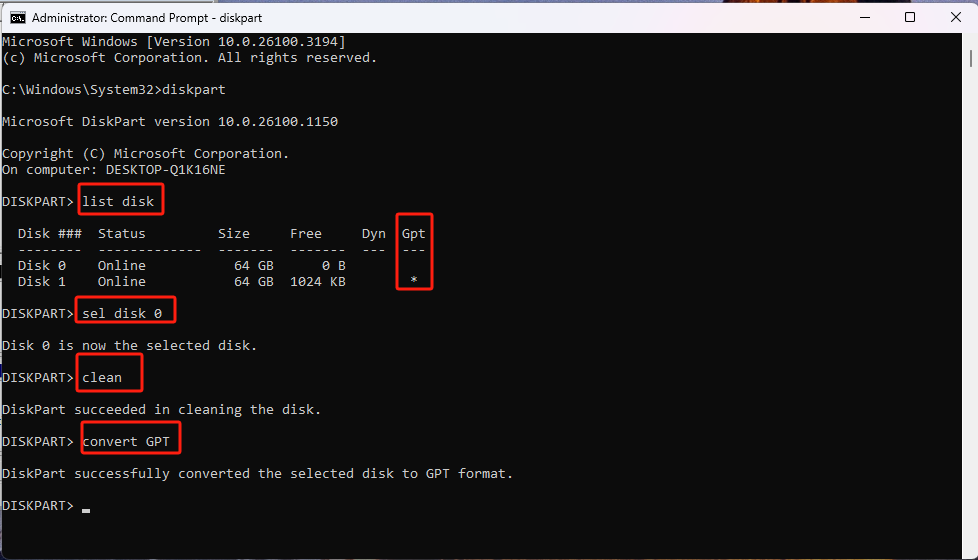
The screenshot below shows you all the commands you need to type in in order to delete all the partitions on the target drive. We will explain all the steps in detail below.
- Step 1: Type in list disk to list all the disks available on this computer.
- Step 2: Confirm which drive is your target drive and then type in sel disk X (X refers to the number of the target drive listed). In this particular case, we choose Disk 4 as an example.
- Step 3: Type in clean This is the command to wipe all the partitions on the selected drive. Please double check you moved all the data from this drive before you proceed.
- Step 4: Type in convert to GPT or convert to MBR. Please be very careful in this step. You will need to select the same format with your source drive. If the source drive is an MBR drive, in here you will need to type in convert to MBR, if it is a GPT drive, please type in conver to GPT. You can learn how to find out what format the source drive is in step 5.
- Step 5: This is the place where you can check whether your source drive is a GPT drive or MBR drive. All the drives with the * mark are GPT drive. In this particular case, we want to clone from Disk 0 to Disk 4. From the listed information we can know the Disk 0 is a GPT drive, so we type in convert to GPT in step 4.
For your reference, Todo Backup Home users can find Refresh Disk in the screenshot below:
For Enterprise users, please refer to the screenshot below:
Delete Partitions in Disk Management
Windows Disk Management provides you the feature to delete a partition from a hard drive. To do that, you can right-click on the partition on the target disk, and select Delete Volume.
You might need to perform this operation on each partition separately until all the partitions are deleted from the target drive.
Note: Some partitions cannot be deleted in Disk Management. If this is your case, please follow the steps in Delete Partitions in Windows Command Prompt to delete them.
If you have any further questions or concerns following this guide, please feel free to contact us at techsupport@easeus.com.