- EaseUS Freeware
- Free Data Recovery Software
- Free Backup Software
- Free Partition Manager
Updated on 2018-01-07
What are system partition and boot partition
Since Windows Vista, the new generation Windows Operating system adopts a new way to be loaded, the two boot files NTLDR/Boot.ini in Windows XP were replaced by Bootmgr/BCD, which help users manage the boot process and the boot menu before Windows loading animation appears, and right after computer hardware self-test.
System partition - Which contains the 2 boot files Bootmgr and BCD.
Boot partition - Where all Windows files are located, including Windows folder, User folder and Program folder etc.
One physical partition can play a role of System and Boot together. But what more common seen is, a separate System partition which is 100MB-200MB around in size lays on left hand side of a boot partition. Or for a multiple OS configuration, even an individual System partition on another physical hard drive is possible. Like the picture below.
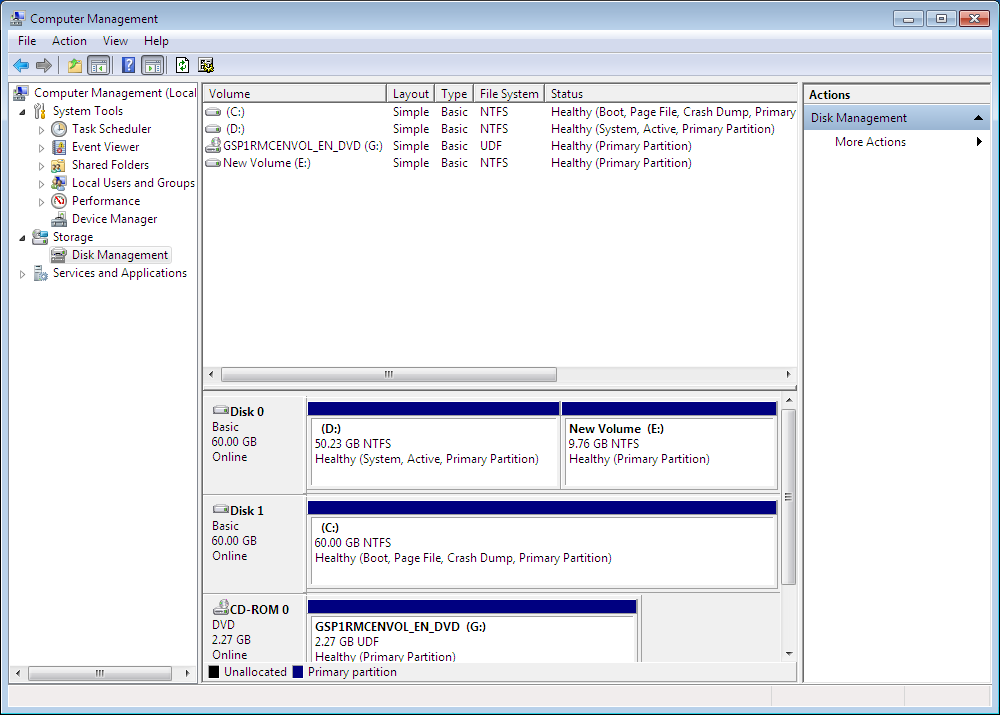
Drive D is the system partition, while Drive C is the boot partition. In this case, Disk 0 and 1 are both required to be connected for a normal Windows loading process. This might be inconvenient when Disk 0 needs to be used for a different purpose or intends to be disconnected. Combining System and Boot partitions, or considered as moving System partition to disk 1, is an efficient solution to free Disk 0 in this case.
This article tells how to achieve that with 3 simple steps.
Caution:
1. The following steps require certain computer knowledge to be finished, any mis-operation would possibly result in system failure. So please make sure every step is made exactly as this article guides.
2. Only if system and boot partitions are on a basic drive, this method works. For a GPT system hard drive, EFI system partition and boot partition cannot be combined.
1. Create new boot files for partition C with Windows bcdboot command. It is a very easy to use command that you just need to specify for which operation system you want to create the boot files.

This operation means to create boot files for the C drive as well as to deploy them in C drive. Furthermore, this command can also help you create boot files into another partition and make that partition as System. The full command then suppose to be:
bcdboot c:\windows /s x:
X is the target partition's drive letter.
2. Set partition C as an active partition. Windows only tries to find bootmgr file from an active partition on a MBR based hard drive, so the second step is to set partition C as active with Diskpart command. Below is a guide picture with just 4 minor steps. Please double check if the correct partition has been selected before running Active command at last.
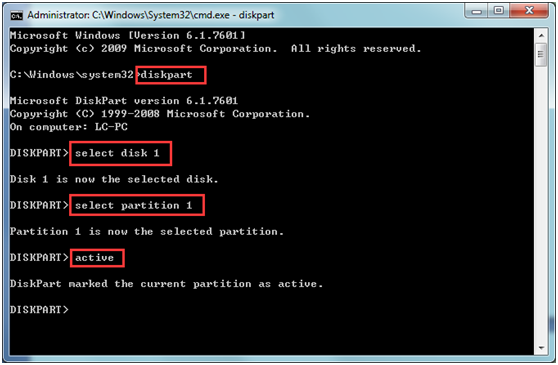
3. Modify boot order in BIOS/UEFI to make sure Disk 1 is in the first location since next boot. Search in Google will give you a lot of tutorials how to do this for a particular motherboard.
After all the steps, the original Disk0 can be removed, and now in Windows, current Windows Disk Management should look like:

If you still have any questions to finish the steps, please feel free to contact EaseUS Support Team.
Was this article helpful?